Saturday, September 4, 2010
Eyeball recipe...
... I know it is kind of early, but look how cute this is for halloween! And they look (looking at the recipe) delicious! Click here to see how to make them :)

Friday, September 3, 2010
Blinged up lock
Our school is so small, we only get P.E. lockers! And we have to buy the schools locks from them. Just plain Silver! And of course, being the crafty girl I am... I glittered it up :) I didn't get a picture though, :( I will try tuesday! All you need is paper glaze (or clear nail polish, but the paper glaze works a bit better) and glitter, like in the picture of the gel nails tutorial. Just coat the lock with the glaze and dump the glitter on. Viola! You have a pretty lock for your locker. I have a guy P.E. teacher and he say the lock in my hand just before we chose our lockers... he was very impressed! He said, "Wow, look at your bling bling!" haha :)
Thursday, September 2, 2010
Kids Camp
For my last two weeks of summer I had one girls and one boys camp at my house (each were one week) I was really lame and didn't really take that many pictures, but I did get some in the pool and on baking day, we decorated cakes and made/decorated paper chef hats. Each day had theme and we did a craft according to that theme, then we played a game, and for the last hour we swam in our pool... 3 hours total! (Some of the girls was fashion designer day, where we tie died t-shirts, and another day was Hawaiian day and we made paper leis and sandcastles.) I had so much fun!


The cute girl on the left definately has the right shirt on!

and of course, the frosting is the best part!

mmmm... well doesn't that just look tasty?!


Wednesday, September 1, 2010
Book Blankes
I started school today, so I thought it would be fun to do a school related craft! Aren't these book blankets so cute?? I would love it even more if it was pink though... haha :) I actually found this on family fun! Click here to find out how to make it.


And it is pretty inexpensive! It could be cuter if you added some flowers or jewels too!
Tuesday, August 31, 2010
Bumble Bands!
Yes! I have finally started selling my headbands! (see giveaway a few posts down) go to http://www.bumblebands.blospot.com/ to check them out! Each headband is $8 with $1 shipping per headband you buy :)
Saturday, August 28, 2010
Cough Drop holder
Yes! I didn't miss Saturday's post :) Anyway... look what I have found! It is a cough drop holer for a get well gift! love it! Go see just give me stamps to learn how to make it!


Friday, August 27, 2010
my new favicon!
Are you tired of your standard orange and white blogger logo for your favicon? [a favicon is the logo next to a web address. (see below)]

Here is a tutorial so you can have a cute one for your blog or website :) And the best part is, it's free!
So first, make your favicon in a photo editing program. I like microsoft paint. Remember to make it simple, and the actual size, it needs to be really small. Now save your picture.
Now find a favicon generator on the web. I suggest this generator
Go to where it says "free favicon hosting", upload your favicon, and then click on "sharpen +3"
When it as uploaded (don't worry, your favicon is sappost to look blury in that picture), click the link that is shown in the picture below
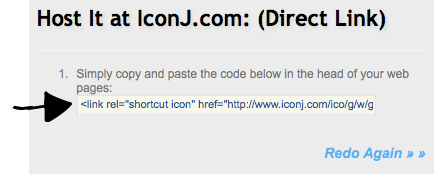
.
Now go to your "Edit HTML" tab and seach </head> (click ctrl f to get the search box). Just paste that link BELOW </head> . click save!
Go to your blog now and your cute favicon is now there! Check out my teen crafting favicon!
Thursday, August 26, 2010
I have already failed.
Ok, I know I said that there would be a craft every day and after 2 posts I already failed. I promise this won't happen again! So here is todays post.

Shannon made this cute double frame! I need to learn how to make it! I love having pictures in my room and this is a good way to show them off!
Sunday, August 22, 2010
Gel nails (well sorta)
I hate going to the nail salon and paying $40 for gel nails. I found another way to do it at home! I love them and mine last about 4 weeks. You can't get the gel stuff unless you are a professional nail person, but these look just as great!
Supplies:
clear nail polish
glitter (I use martha stewart fine brand from michaels, but you can just use any gitter)
paper plate (or just a piece of paper)


Supplies:
clear nail polish
glitter (I use martha stewart fine brand from michaels, but you can just use any gitter)
paper plate (or just a piece of paper)

Now paint one toe nail (not all because it will dry to fast) and sprinkle the glitter on it... repeat with the rest of your nails. Make sure you do this on top of the paper plate or TONS of your glitter will be wasted. Once you are done, pour the glitter back into the bottle.

Now, once you have done both feet, paint on another layer and repeat the process again.
Once that 2nd layer is dry, you can do one more layer, but it probably won't be necessary. (I didn't have to) If you don't have to do another layer, just paint on an extra (pretty thick) clear coat on top of the glitter.

See? How easy was that? The look super cute and you didn't pay 40 bucks!
40th birthday cake!
My dad's big 40th birthday was this past july! I was inspired by Kristen's 1st birthday cake! I loved making this cake! It turned out so cool! I used fondant, for both the main part and the polkadots. When I mixed in the food coloring, I didn't entirely mix it in all the way so that it would have a tie-dye effect. The fondant recipe is below... SO easy! Be patient while making it though. When you first start to kneed it all together, it is VERY sticky and is a huge mess. It took me about 15 minutes before it was just barely starting to look a thing like fondant like you see on "Cake Boss" or "Ace of Cakes"!
(I got all of this from this website)
Ingredients:
16 ounces white mini-marshmallows (use a good quality brand)
2 to 5 tablespoons water
2 pounds icing sugar (please use C&H Cane Powdered Sugar for the best results)
1/2 cup Crisco shortening (you will be digging into it so place in a very easily accessed bowl)
Directions:
NOTE: Please be careful, this first stage can get hot.
Melt marshmallows and 2 tablespoons of water in a microwave or double boiler. To microwave, place the bowl in the microwave for 30 seconds, open microwave and stir, back in microwave for 30 seconds more, open microwave and stir again, and continue doing this until melted. It usually takes about 2 1/2 minutes total.
Place 3/4 of the powdered sugar on the top of the melted marshmallow mix.
Now grease your hands GENEROUSLY (palms, backs, and in between fingers), then heavily grease the counter you will be using and dump the bowl of marshmallow/sugar mixture in the middle.
Start kneading like you would bread dough. You will immediately see why you have greased your hands. If you have children in the room they will either laugh at you or look at you with a questioning expression. You might even hear a muttered, “What are you doing?”
Keep kneading, this stuff is sticky at this stage! Add the rest of the powdered sugar and knead some more. Re-grease your hands and counter when the fondant starts sticking. If the mix is tearing easily, it is to dry, so add water (about 1/2 tablespoon at a time and then knead it in). It usually takes me about 8 minutes to get a firm smooth elastic ball so that it will stretch without tearing when you apply it to the cake.
It is best if you can let it sit, double wrapped, overnight (but you can use it right away if there are no tiny bits of dry powdered sugar). If you do see them, you will need to knead and maybe add a few more drops of water.
Prepare the fondant icing for storing by coating it with a good layer of Crisco shortening, wrap in a plastic-type wrap product and then put it in a re-sealable or Ziploc bag. Squeeze out as much air as possible. This fondant stores for up to 2 weeks.
**Please note, this is not my recipe, click the link right above the recipe for the original copy if you would like**

you have to remember this was my first somewhat succesful attempt at making fondant, so yes, there are some cracks and dents in the cake! haha, next time it will look better :)
Saturday, August 21, 2010
365 Crafts!
I am going to do a post a day for the next year! Which is 365 crafts for you to do! And I love comments, so be sure to COMMENT on the crafty thoughts link :) It may not be a craft a day, because some days there will be giveaways! Oh and remember to "follow" me!
Friday, August 20, 2010
OH SO CUTE tank
This lovely lady have created an adorable little girls tank out of a plain old women's cami! I HAVE to do this! She cut the bottom so that there is left over fabric for the cute staps and flowers! For the full tutorial, click here.

Sunday, August 15, 2010
Headband Giveaway!
I have been really into making these headbands lately, and I have decided to give one away :) there are a few ways to enter (which gives you more entries!) 1st entry: comment on this post. 2nd entry: leave a comment on my main blog. 3rd entry: "follow" this blog, if you have already done so, that is an extra entry for you automatically! On either this blog or my main one, just let me know which of the entries you did! Leave your email in the comment so I can let you know if you have won. If you have any questions, please contact me at teencrafter@gmail.com. This giveaway ends this Wednesday night :)


Tuesday, July 27, 2010
Watches!
I am going to start selling these darling beaded watches! I wear mine every day! For the watch face and the band together, it is $38. For just the band itself it is $22... The beads I buy are high quality and more expensive, same with the string. below are some that I have made. The bands are interchangeable so you don't have to keep buying the faces. To purchase one, please contact me at paulsonallison@gmail.com and let me know what colors you would like, and what size.
Sizing:
Small (wrist size 4.5 inches - 5.5 inches)
Medium (wrist size 5.5 inches - 6.5 inches)
Large (wrist size 6.5 inches - 7.5)
Please let anyone know about this that is interested! Below are some that I have made.


Sizing:
Small (wrist size 4.5 inches - 5.5 inches)
Medium (wrist size 5.5 inches - 6.5 inches)
Large (wrist size 6.5 inches - 7.5)
Please let anyone know about this that is interested! Below are some that I have made.


The one above I had originally bought but it broke and I lost some of the beads so I had to re-make it
Thursday, July 22, 2010
Magnets
I made these for the magnet board that I made in my room. I love them! :) the tutorial is below.
First print off the pictures (make sure they are sized right first so they are not too big or too small for the stone) and then place the stone on top and trace around it with a pencil. After you do that, cut on the lines.


For this project you will need clear stones (you will see what they look like... I don't really know what to call them haha), cute paper that you print off/pieces from a magazine to put behind the stone, magnets, super glue, and mod podge. You really do need mod podge for MANY projects, so you should buy it!
 |
Now paint a thin layer of mod podge on the flat side (the picture below has a little too much) and stick the paper onto the back face down and paint on another layer on top of the paper.

Once that dries, super glue a magnet to the back and your done. See? That was quick!

I made WAY more than this. If you want a copy of all the paper I used, just leave a comment so I can email it to you to use for your own magnets!!
I LOVE countdowns so I spelled out c-o-u-n-t-d-o-w-n, printed of some things I was excited for on microsoft word, and the stones work perfect with dry erase markers so I put some cute paper behing the back and change the dates every day.

Wednesday, July 21, 2010
Easy and inexpensive ADORABLE journal!
I was in need of a little craft so I went down to albertson's and got just a plain old spiral notebook (about $1) I covered it with scrapbook paper, ribbon, and rhinestones and it is DARLING! I am so excited to write in it. There is an easy step by step tutorial below.


That above is what you will need - notebook, ribbon, Scrapbook paper (If you want some really cute free paper, visit shabby princess and print some off... that is what I did and it worked great!), and mod podge. I use mod podge in almost every craft that I do... I highly recommend buying it (I like the gloss the best) You will also want just a plain piece of white computer paper.

Coat the notebook with a thin layer of mod podge all over.

Trim the white paper to fit on the spiral notebook and stick it on top of the mod podge while smoothing it out so there are no bubbles. You only have to do this if you printed off the scrapbook paper or yours is really thin because you will be able to see the color of the spiral through the scrapbook paper if you don't. When you put the white paper on though it doesn't need to fit exactly.

Trim the scrapbook paper so that it will fit onto the notebook the way you want it to (I would suggest the way I did it above... it seems to work out in the end better this way) Then paint on another layer of mod podge on top of the printer paper and put the scrapbook paper on. Again, smooth it out so there are no
bubbles!

Wait 2 minutes after the step above before doing this one. Now do an extra coat of mod podge on top to give it a shiny glossy look. This also makes it slightly more water resistant!

Wait 5-10 minutes before doing this step. Now outline the ribbon all around the border of the scrapbook paper and inbetween were the separate paper meets and secure it with hot glue. When doing it around the border, leave a little extra on the sides to wrap around to the back to make it look better. I think it is really cute to use to different kinds of ribbon! (see below)

For the last step I just added some sparkle with rhinestones. It would be really cute to use buttons or fake flowers as well!
p.s. if you haven't done so already, make sure to "follow" my blog! :)
Tuesday, June 29, 2010
Car seat cover
This is cute, cute, CUTE! I know that I am a little young to have to make this... but it makes the perfect handmade gift! I have to learn how to make this!


now head over to make it do!
This is another thing that I found... perfect for my mom's camera!!!
go see this link :)
personalized name block
I learned how to make this last week at a family reunion, isn't is cute? I have a cousin who is all about crafts, just like me! So, all of the girl cousins got to do a craft every day. This one was my favorite :) When I got home, I went out to home depot and got some 2x4, took it home, and cut it up. (this is a little different from what I made at the family reunion) This plain old piece of wood turned into this:


Isn't it cute??? I love it! I put in in Caroline's room and it matches PERFECTLY! I forgot to take pictures of the process, but I will try to do a step by step tutorial later.
Saturday, June 26, 2010
Birthdays?
Anyone have a girl that is having a birthday party soon? Need a cute invitation? Go see my etsy shop! I have quite a few adorable party invitations for just $1.75. Spread the word! Go check them out here. Below is just one of them :)

Monday, June 21, 2010
I like Mike
I know that this isn't crafty, but I have to get this message out there. My uncle Mike Lee is running for U.S. senate for Utah against Tim Bridgewater. Mike wold be a great senator, so if you live in Utah... please, please, please vote for him! If you live elsewhere, please tell any relatives and/or friends about him. Now VOTE VOTE VOTE on Tuesday the 22nd! To learn a little more, go to my aunt Melissa's blog, Jordan Lee, or mikelee2010.com!


Thursday, June 10, 2010
flower pens
These cute flower pens make a great gift for anyone! Or even keep them for yourself. I have always wanted to learn how to make these and now I have :) Head over to Crazy Craft World to get the tutorial!

clip holder
Do you need somewhere to keep all of your clips? Well, I have came up with a cute, and easy idea! I sell clips at my local dance studio that I teach ar and needed to keep them organized! This was just perfect and would work great to hang up on the wall in your own home :)
First, buy a plain white canvas from a craft store (I got this at Michaels) and paint it whatever color you want with acrylic paint... I think it would also be really cute to cover with fabric! But, I needed to get this done quickly, so paint would work the best for me.

Now, hot glue or staple thick ribbon to the back (hot glue works the best in my opinion) and get it tight, but not too tight, you want the clips to be able to grip on.

This is what the front should look like. (sorry, this picture is sideways)

Or this... This one is bigger because it holds the silk flower clips that are much larger.

This is the very end, finished result with the silk flower clips. For some reason, some of the white rhinestones look yellowish. Oh well!

p.s. If you do this, please blog about it and leave me a comment so I can link over and see yours!
Tuesday, June 8, 2010
mailing anything anytime soon???
Want to mail something (like a gift) to someone, and still have it look like its wrapped up? Well now you can, without having to buy an ugly yellow padded envelope! Sew Sweet Stitches (click on the link for the tutorial) came up with this idea to make your own, cute, personalized one! I would love to do this, especially because I like to mail things... don't you think it's fun to get something in the mail??? Especially if it looks cute! Why not make someones day and send them something nice! :)


Subscribe to:
Posts (Atom)